Thursday, March 31, 2022

How will an On-demand Mobile App boost the profitability of your Car Repair Business?


The vehicle repair sector has undergone a rapid transformation in the last few years. With the advent of technologically advanced luxury cars decked up with avant-garde software systems, the task of repairing has become no less than a high-tech occupation.
Moreover, in today’s fast-moving era, tech-savvy car owners are reluctant to pay visits to the repair facility and prefer obtaining hassle-free repair services at their desired location instead. So, an on-demand app offering car mechanic services is trending these days.
A well-crafted app proves highly profitable and advantageous for a car repair store. Therefore, several automobile businesses are roping in an experienced on-demand app development company for designing customized auto care and repair software solutions.
This post enlightens you about the reasons why developing a customized car repair app proves to be an intelligent business strategy. Before we proceed further, take a sneak peek into how an on-demand automobile repair app works and the must-have features of a car repair app.

How Does an On-demand Automobile Repair App Work?

    • The vehicle owner i.e. the customer logs into the app and chooses the model of their car.
    • The customer chooses the service required and instantly receives a fair quote for the opted service.
    • The customer books an appointment.
    • The technician provides the desired services for the car and drops the car back.
    • The user makes an online payment using the app

    Car Repair Application: The Essential Features to Include

      • Inclusion of apps for admin panel, car owners as well as mechanics
      • Advanced search filters and an in-app messaging facility
      • Real-time GPS tracking for tracking mechanics and easily reaching the customers’ location
      • Transparency in pricing so that customers get to know about the actual value of parts changed and the service charges separately
      • In-app wallet facility and secure payment options
      • Facilities of fare estimation and invoice generation
      • Support for multiple languages and even currencies if required
      • Online support and push notifications
      • Customer reviews and ratings
      • Discounts and offers

      Business Benefits of an On-demand App offering Customized Car Repair Services


      Establishes Digital Presence
      Modern vehicle owners rely on the web or smartphone apps for obtaining every product or service they require. Hence, possessing a mobile app or even a web version showcasing your car repair services; enables your business to appear in the market search. This increases your visibility in the local area resulting in more customers; this can be achieved using the QR codes in smartphone apps. Thus, this approach not only establishes your online presence but also allows you to effortlessly expand your customer base.
      Delivers User-friendly Services
      An on-demand app for car repair proves super convenient to users. Users can instantly book skilled mechanics with the help of a few clicks on their smartphones. Once the consumers submit their vehicle details and choose the required service, garage owners send repair personnel for service assistance to the customers’ home, office, or any other desired location. Besides, there are times when vehicle owners encounter sudden hassles like a car breakdown or a flat tire in the middle of a highway; and it becomes a daunting task to find a nearby garage or repair services. During such situations, an on-demand car repair app turns out to be the savior; as vehicle owners can book repair services via online channels at any time, from anywhere. Additionally, the car owners enjoy the facility of scheduling future appointments digitally, for follow-up service and maintenance.
      Enhances the Productivity of your Services
      Thanks to the vehicle repair software embedded within apps, one gets portable access to all data and technical information concerning auto repair. As such, technicians don’t need to leave their current location while repairing; for accessing desktops/laptops. This eases out complex tasks, thereby saving technicians’ time and enhancing the overall productivity of your car repair facility.
      Take a detailed look at how this process is executed!
      • Smartphones utilize their in-built Bluetooth connection adapter to establish connectivity via a particular port which is used by the mechanics for searching methodologies, wiring diagrams, illustrations, videos, technical service bulletins, diagnostic data, etc. within a couple of minutes.
      • A wide variety of auto mechanics models, ranging from basic guides to advanced mobile apps, are available. These assist the engineers in creating new ideas and products concerning vehicle repair.
      • You can convert all the models and data into electronic files using WiFi, and this data can be easily managed by various systems of car repair facilities.
      Secure Paperless Store Management
      CRM software (customer relationship management software) is immensely beneficial for your auto repair business. It helps in providing you clear visibility of every customer interaction, enables you to track sales, eases out collaborations with different teams, organizes/prioritizes opportunities, etc. Furthermore, the adoption of CRM software enables vehicle repair stores to execute paperless operations while maintaining safety protocols. Also, it provides backup which is a sigh of relief for the owners.
      The technical offerings of this software include the following:
      • OBDII scanner through Bluetooth
      • Quick estimator
      • VIN scanner tool and License plate
      • Custom service palette and custom packages
      • Ordering of accurate parts
      • The facility of exporting data, wiring diagrams, and videos
      • Order usage history, sales tax reports, and service bulletins
      The aforesaid goodies have modernized the car industry operations to a great extent. And surprisingly, such a modernized car repair solution proves to be far more cost-efficient as compared to the erstwhile manual approach of executing the required tasks.
      Ensures Accuracy while Scanning of Data
      Vehicle repair and maintenance, call for loads of hassles. This is because, for addressing issues like bug fixes, providing smart vehicle specs, and service bulletins; there arises a need to collect and store a host of data, export wiring diagrams, and videos for implementing ingenious solutions. All these action items become quite challenging if the human workforce is involved and things are executed manually.
      However, the vehicle repair software offered by an on-demand app has simplified these tasks. It provides the onboard diagnostic scanner (OBDII scanner/OBD2) via Bluetooth. As such, technicians can easily scan a collection of information for creating specs that include VIN Barcodes, speech to text conversion, and diagnostic trouble code (if any). The software can also display live data streaming from the camera as well as impart a bi-direction control – capacity of the controllers to execute actions other than normal operations with fingertips.
      Maintains Records for Custom Vehicle Reports
      An intelligent on-demand app for vehicle repair offers the facility of auto repair care services to dealers, fleet managers, and vehicle owners unanimously. Its real-time car maintenance authorization tool works wonders in fulfilling customer demand and expectations. Coming to the task of vehicle repair, the software version digitalizes all the functions of the entire process.
      For instance, key functionalities available to customers are customer authorization, balance reminders, service bulletins, reminders concerning legal documents, preferred service providers with ratings, etc. While providers enjoy features such as a searchable database with specs of vehicles, digital inspection including wiring diagrams, a database including parts and items, workflow status, and many more.

      Concluding Views:

      The evolution and expansion of mobile app technologies have opened up new horizons for delivering exceptional user experiences and expanding the customer base. So, it’s a golden opportunity for automobile businesses too, to leverage the potential of phenomenal app solutions for generating revenue and promoting business growth. The ones reluctant to adapt themselves to changing times are bound to fall behind in today’s dynamic and competitive market. So, it’ll be a smart move to seek the assistance of on-demand app development services for fulfilling your objective.
      Have you already smartened your car repair business with futuristic app solutions? If so, do share enlightening occurrences you’ve experienced. And, if not, seek professional help from an experienced software development company like Biz4Solutions. We offer dedicated developers who will help you build the app you have envisioned.
      To know more about our core technologies, refer to links below:

      Monday, March 28, 2022

      How To Debug React Native Apps Like A Pro


      Debugging is one of the crucial activity during the software development. It refers to the process of identifying an error in a software application that causes performance issues, then analyzing the issue, and finally resolving it. Debugging allows you to validate your code and fix issues before pushing a software application into the production stage. However, debugging issues are likely to arise during various phases - development, testing, and even production/post-deployment. And, implementing the right debugging tools and methodologies will speed up development and enhance the efficiency of the end-product.

      Coming to React Native debugging; the framework is made up of different environments, the most prominent being Android and iOS. As a result, it becomes challenging to debug apps due to multiple platforms involved. Moreover, React Native offers a huge variety of tools for debugging which seems confusing for many, particularly newbies. This post guides you through some effective practices and useful React Native and React debugger tools that will help you to identify issues and fix them like an expert.

      React Native Debugging Methodologies and Best Practices

      Identifying and Addressing Console Errors, Warnings, and Logs

      Console errors and warnings are visible in the form of on-screen notifications with a red or yellow badge.

      Errors

      Errors will be displayed inside a RedBox with the command console.error(). This RedBox contains a description of the error and also a suggestion on how to resolve the error. Take a look at this example. If you write a style property that the React Native framework doesn’t support, or if you write a property meant to be used for a particular element (like a backroundImage needs to be set for the element View), then the RedBox shows an error along with the list of supported style properties that can be applied to the View.

      Warnings

      Warnings will be displayed inside a YellowBox with the command console.warn()Such warnings include information on performance-related issues and deprecated code. Most of these warnings indicate some bad practice within your code. Examples of warnings include a notification about the presence of an eventListener that isn’t being removed, the presence of deprecated features and dependencies, etc.

      Logs

      For issuing logs, either use the command react-native log-android or use the Chrome console with the command console.log (string str)

      React Native developers can hide the notifications concerning errors and warnings with the command LogBox.ignoreAllLogs() whenever needed, like during product demos. You can also hide the notifications on the basis of per-log with the command LogBox.ignoreLogs(). This method works in scenarios when a noisy warning cannot be resolved like the ones in a third-party dependency. But, whenever you ignore logs, make sure to create a task for fixing those ignored logs later.

      Debugging using React Native’s built-in Debug Mode

      Check out how to utilize the built-in debug mode offered by the React Native eco-system employing browsers like Safari or Chrome.

      Debugging with Chrome

      Install these react-devtools for supporting React Native: Yarn and NPM. Then use the development mode to open the in-app developer menu; here you start the debugging process by activating the debug option.

      From the Developer Menu, select the option Debug JS Remotely. This action opens up a channel to a JS debugger. A new tab opens; here, from the Chrome menu, choose Tools – Developer Tools; for opening the devtools.

      The other most prominent options to utilize in the in-app developer menu to debug apps are:

      Enable Live Reload: for automatically reloading the app, Enable Hot Reloading: for identifying the modifications that result in a changed file, and Start Systrace starts the Android marker-based profiling tool. The option Toggle Inspector helps in toggling an inspector interface. This way, developers can inspect UI elements present on the screen and examine their properties. Then an interface is presented; this interface contains other tabs such as networking for displaying the HTTP calls as well as a performance-related tab. The option Show Perf Monitor tracks your app’s performance.

      Debugging with Safari

      Your app’s iOS version can be debugged using Safari, and here, you do not have to enable “Debug JS Remotely”. Simply open Preferences and then select the following options:

      • Preferences
      • Advanced
      • Show Develop menu in the menu bar

      Next, choose the JSContext of your application:

      Develop – Simulator - JSContext

      Now, the Web Inspector of Safari is going to open and you would be able to view a Debugger and a Console. And, each time you reload the app, either manually or by using the fast refresh (live reload), a new JSContext will get created. Remember to select the option Automatically Show Web Inspectors for JSContexts; otherwise, the latest JSContext will be selected manually. 

      Prominent React/React Native Debugger Tools

      React DevTools

      This set of React tools is employed for debugging the component hierarchy of React and works well for front-end operations. Using this toolset, you can view what’s there deep within your component tree – select the options state of the component and edit the current props.

      React Developer Tools are the extension to the browsers Firefox and Chrome. However, to debug apps built in React Native, you need to use an autonomous version of React DevTools and run this command on your terminal - npm install –g react-devtools. Then launch the app by running the command react-devtools; select the option Show Inspector from the in-app developer menu for examining the app’s UI elements.

      If Redux is used, then you need to use React DevTools along with ReduxDev Tools to fully understand your component’s state. For this, Redux DevTools need to be separately installed and here, the tool React Native Debugger proves quite useful as well.

      React Native Debugger

      The React Native Debugger is immensely beneficial if Redux is used during React Native app development. This is a standalone tool that functions on Linux, Windows, and macOS. This tool is used for logging or deleting Async Storage content, detecting as well as diagnosing performance issues, and examining network requests.

      The best part is that it integrates React DevTools as well as Redux DevTools within a single app and so, there’s no need for using two separate applications to debug apps for the React and Redux environments. The tool offers interfaces where you can examine and debug React elements and also view Redux logs and the related actions.

      React Native debugger outshines Chrome DevTools in employing the toggle inspector for inspecting React Native elements. Besides, React Native debugger provides the functionality for editing styles; this feature is not present in Chrome DevTools.

      Flipper

      Flipper is a cross-platform tool used to debug JavaScript apps as well as the device and JS logs. It launches simulators for managing devices, can connect with several devices simultaneously to debug apps across multiple platforms, and involves a single-step debugging process including watchpoints and breakpoints.

      Flipper edits the components on the fly, then reflects those edits in real-time within the application, and integrates with the app’s Layout Inspector. Its capability of integrated launch management enables developers to define configurations and employ them for unit testing, without having to replicate configurations in several places. Moreover, comes with a plugin-based architecture and myriad handy features; more features are expected in the coming years.

      With Flipper, you can view, inspect, and control your apps using a simple desktop interface. Flipper can be used as it is or extended employing the plugin API.

      Check this blog to gain more insights on other important tools for debugging React Native apps!

      Bottomline:

      The aforesaid tools and methodologies enable you to debug apps more efficiently and flawlessly, just like a pro. These tools and best practices work wonders to speed up development, enhance developer productivity, and improve the performance of the end product.

      Would you like to team up with skilled app developers who comprehend the functioning of your React Native apps, identify issues at once, and fix bugs instantly? If yes, then Biz4Solutions, a distinguished outsourcing software development company is worth a try! We specialize in offering competent React Native development services and take care of the entire product lifecycle from app ideation to maintenance post-deployment.

      To know more about our other core technologies, refer to links below:

      Swift App development
      .Net App Development
      Java App Development


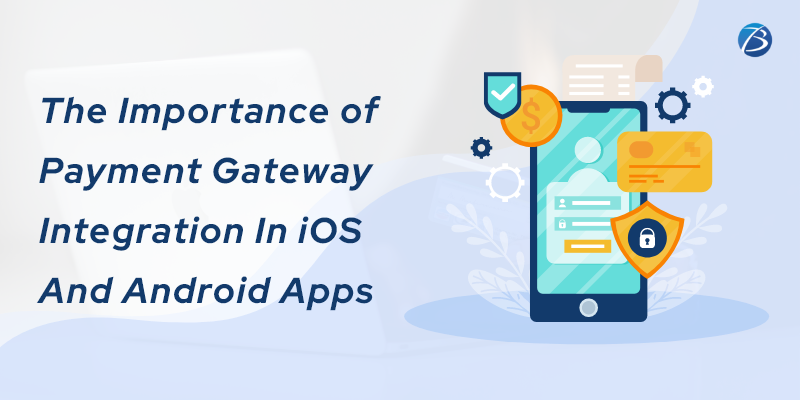
      The Importance of Payment Gateway Integration In iOS And Android Apps


      mobile app development

      Do you carry cash everywhere or a smartphone?
      Don’t we all shop from our smartphones? Lately, mobile payments have gained prominence by providing a fast and easy way to make purchases and helping users save time and get an enhanced shopping experience.
      How do we make the payment then? Of course, with the help of online payment options using payment gateways. Whether you talk about Retail companies, or you are on e-Commerce stores, freelancing platforms, travel agencies, they all are using payment gateways to help ease your payment.
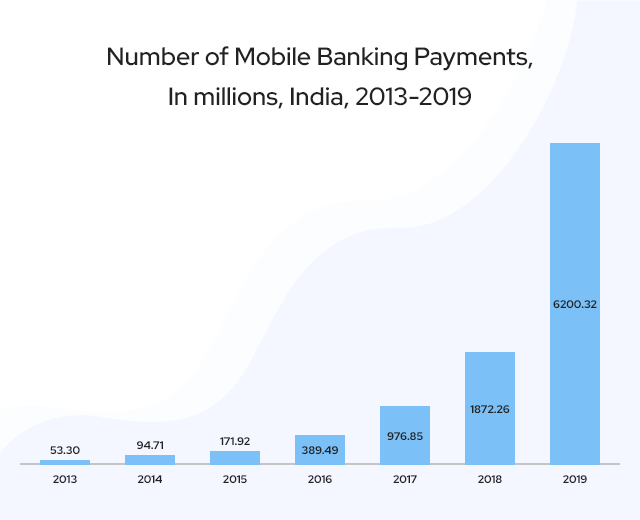
      Based on Statista website, by 2023, there will be around 1.31 billion proximity mobile payment transactions by users worldwide.
      The payment gateway integration is not subject to one mobile OS; it’s for both Android and iOS. These two OS’s have captured the entire global market, as we all know. Let’s uncover the crucial aspects of integrating payment methods for both Android and iOS.
      Let’s start with;

      What is a Payment Gateway

      Payment gateways are the median between online customers and financial institutions. Without intermediaries, in-app purchases and payment processes can’t take place.
      As we see, many apps like Amazon, Netflix, etc., ask for a subscription to watch shows, movies, etc. While paying for a subscription, it gets easy as, within a few steps, users can buy the subscription via the third-party app (Google Pay, PayPal).
      The funds move through an interbank network, a complex sequence of operations and create risk associated with security assurance. It just takes users a few seconds, but it’s a huge amount of work to deal with underneath the app.
      Fortunately, banks take responsibility for all transactions and data safety, but how do you deliver this information to the bank? How will the application know that the customer has funds in his accounts and the account belongs to the customer?
      Moreover, what about storing your payment details? What if all this information gets in the hands of the wrong people? Who is responsible for this? Both business owners and mobile app developers should not be the ones to bear this blame.
      To get deep insights, let’s now understand how a payment gateway works?
      payment apps
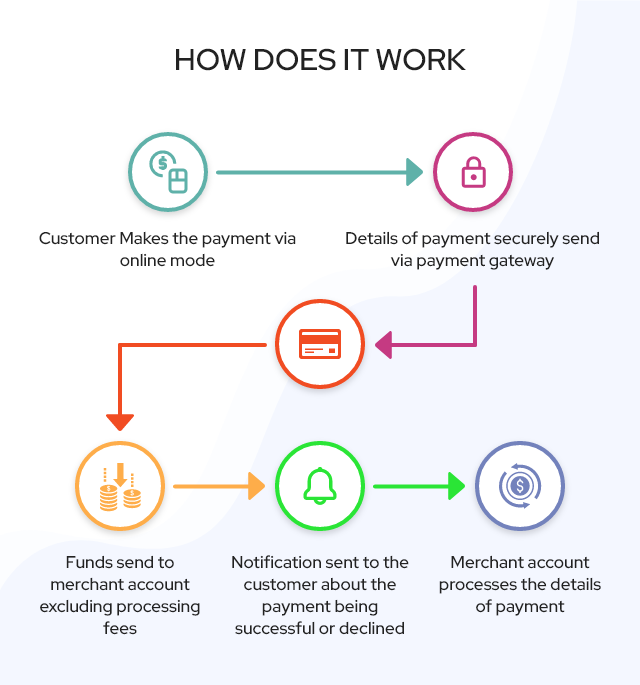
      • Before opting for payment, users open a cart to buy the items they like. After doing so, they go to payment, wherein you have to enter debit or credit card details.
      • The information you fill in is sent to a payment gateway system. It then encrypts user data and passes it to a payment processor.
      • The payment processor is another mediator that begins the transaction process and gets feedback from the bank (Visa or Mastercard).
      • The processor verifies the data accuracy and then transmits the information to the bank (financial institution), which has to finalize the verification (it takes seconds).
      • After approval, the amount is withdrawn from the buyer’s card and sent to the merchant’s account.

      Why choose payment gateway integration?

      Considering the USA market, one can expect the USA Digital payment market to register a CAGR (Compound Annual Growth Rate) of 12.14% over the forecast period from 2022 to 2025 (Source: Statista). Hence, it has become the most important aspect of any business.
      The positive thing is that it allows collecting money through the customer’s preferred bank without risking sensitive data.
      With the increasing awareness about the ease of online transactions and digital evolvement, consumers are changing their priorities for making payments online. Hence it generates confidence among the users for switching to online transactions, which is why we see the boost in payment gateways.
      Here we will see what the trend globally looks like:
      payment gateway integration
      In the year 2020, the size of the mobile payment market across the globe was valued at 1.54 trillion USD. This value rose to 1.97 trillion USD in 2021. The market has been predicted to grow at a CAGR of 29.1% from 2021 to 2028 and reach 11.83 trillion USD by 2028.
      payment gateway integration

      How to do the integration of payment gateway with iOS and Android?

      • Install the app or any type of payment gateway based on your needs, such as the size of the business, industry or the targeted country.
      • One should add client tokens when the server sends a request from your app. It helps generate a new token on every app launch with full authorization and configuration specifics to let the client initialize the SDK. One can execute it using various programming languages like JavaScript, React, NET, PHP, Python etc.
      • Then the software developers will test the credentials such as customer id, public and private keys etc.
      • It is important to install additional certifications that accept the PCI-DSS for better security. Further, the Secure Sockets Layer (SSL) guarantees clients’ sensitive information protection.
      • While processing a transaction, the one-time payment method needs to be configured. It works as: the client sends you card information, the gateways forward it to the server and uses that data to initiate the transaction.

      How to know the best applicable payment apps for you?

      mobile app developer
      Firstly, make sure the payment gateway supports your product.
      Many payment gateway providers support both digital and physical products. However, not everyone does that, plus some product groups are riskier, so the providers don’t join in.
      For example, Stripe has Restricted Businesses, including investment and credit services, gambling, adult content and services, get-rich-quick schemes, and many other categories.
      Thus, you must be sure you’re on the “white list” of a particular provider.
      Pay attention to pricing
      When it comes to payment gateway integration, keep in mind these fee types: monthly fee, gateway setup, merchant account setup, and per-transaction fee.
      Dig through gateway documentation to ensure there are no hidden fee charges and the pricing policy is crystal clear.
      Check payment methods and card types
      You should always list payment tools and services used by your audience and make sure that a payment gateway of your choice supports all of them.
      The integration of digital wallet payments differs from payment card support because of different tokenization processes. You must check if a payment gateway allows using mobile wallets.
      Another essential point is that if you are targeting the international market, check the cost for businesses and multi-currency payments as some gateways require additional fees.
      Study transaction limits
      Payment gateways often have limitations for the numbers or amounts of transactions to take place. For example, Square’s maximum transaction is 50,000 USD. This amount is enough for most businesses but may not be the same for you. Anything beyond this limit needs to be split into different instalments.
      Look closely at merchant account options
      A merchant account is an intermediary account where payments are parked before you get them, a kind of money storage. It is basically for a smooth shopping experience. At times buyers want to return the product or get a refund. To clear such issues easily, one can manage them with the money accumulated in your merchant account.
      Well, when we talk about merchant accounts; then there are two types to know about: First is a dedicated account that is for your business only. It helps you to control your money and operations. Companies with dedicated accounts usually receive faster transactions, but paying a higher price is also necessary to obtain the shortages.
      The second is an aggregated account for several merchants (businesses). Mostly, entrepreneurs pick this option as it’s cheaper and easier to set up (it takes less than 24 hours).

      The Use Case: Square

      Currently, three payment apps mostly applicable for payment gateway integration are Square, Stripe, and PayPal.
      Square is the application that provides an all-round top choice for making payments in different ways (online, invoices, in-person, over the phone). It comes with many free features, a powerful POS app, and attractive equipment options.
      Square acquired many companies, including Storehouse, Fastbite, and Kili. Major competitors for Square are Google Wallet (GOOGL), Intuit Inc. (INTU), and PayPal-owned (PYPL) Venmo.
      Let’s see what Square provided to a company named Kili (developed silicon, electronics, and software that simplify and optimize payment processing) after the acquisition.
      While Square already offers a payment option to the users of credit cards via mobile, the Kili acquisition will let the company begin experimenting with Near Field Communication (NFC) payments (like Apple Pay). It will help compete with larger companies by delivering simple and affordable hardware that gives the sellers a safe and smart way to do business.

      Conclusion

      Does your company deal with any kind of online transaction? You need to allow payments in your mobile app. Using a payment gateway will give you a competitive advantage. The payment gateway is the connecting link between the bank and the customer and removes the hassles associated with safe data storage, transaction security and fraud detection.
      Want to build an app that requires online payment gateway integration and looking for a mobile app development company to help you? Contact us today.
      To know more about our other core technologies, refer to links below:

      Wednesday, March 23, 2022

      The Essential Features and Cost of building a Messaging App like Signal!


      WhatsApp used to be the most popular messaging app, but not anymore, ever since its revised privacy policy was declared in January 2021. This policy asked users to share their personal information to Facebook. Needless to say, this declaration has adversely affected WhatsApp’s sky-high popularity as one of the most secure and encrypted messaging options. And, the Signal messaging app, which was earlier unnoticed by messaging app users, started to be adopted as the ideal replacement for safe messaging.

      Signal has gained an undisputed reputation of keeping users’ chats and calls truly encrypted and private. Even high-profile users like Elon Musk, Brian Action, and Edward Snowden have endorsed Signal’s uncontested privacy quotient, because of the level of secrecy and security it offers.

      Investing in a messaging app like Signal is a brilliant idea and many of you must have already started the app ideation process as well! So, this post explores the unique selling points of Signal, the necessary features to include while building a Signal-like app, and provides an approximate idea on signal app development cost.

      Signal App: An overview

      Signal is a cross-platform messaging application that follows the approach of app models like Red Phone and Text Secure. It has bagged the reputation of being the most encrypted and secure application available in the market. Signal, being open-sourced; its source code is available on GitHub and can be accessed easily.

      Using Signal chat, users can avail of one-to-one messaging as well as group chatting in the most secure manner possible. Users can share images, voice notes, files, and videos and make video/audio calls without having to worry about the risks of account hacks or data breaches. The reason is that Signal adheres to highly encrypted messaging protocols like Double Ratchet Algorithm, Extended Triple Diffie-Hellman, HMAC-SHA256, Curve25519, and AES-256, to rule out any chances of MITM (man-in-the-middle) hacking attempts. Moreover, all calls and messages that take place over the app are end-to-end encrypted, such that even Signal cannot access users’ data. Furthermore, the app doesn’t allow users to take a screenshot.

      This revolutionary app has been created by the Signal Technology Foundation and the Signal messenger LLC.

      Signal’s Unique Functioning Protocol to ensure Security

      Here’s how an encrypted messaging application works!

      When the app is installed on a smartphone, a permanent key pair gets created. This key pair consists of a “public” and a “private” key that are meant to encrypt and decrypt messages. The process of encrypting and decrypting works like this – the “public” key is sent to the messaging server for identifying users and the private key stays within the users’ smartphones. And, if this private key is compromised, the users’ messages become vulnerable to security threats like decryption and misuse.

      The Signal messenger uses a more secured protocol. It generates several temporary key pairs besides their permanent keys. This function empowers the app to change the key after each message. When a user sends a message to another user via Signal, it integrates the temporary and permanent pairs of public as well as private keys for both the users to create a shared secret key. This secret key encrypts and decrypts the message. And, as the private keys of users must be accessed for generating the secret key, the secret key stays only on the devices of the users involved in the messaging act.

      Moreover, Signal adheres to the protocol of continuously replenishing keys for each user, and this function allows the app to acquire new shared keys after each message. Also, features like disappearing messages, turning off the lock screen notification option, blurred photos, and encrypted calls; tighten the app’s security further.

      Essential Features to include in your Signal-like Chat/Messaging App


      Real-time Messaging and Object Sharing

      Real-time messaging is a core prerequisite; using this feature users enjoy real-time interaction from any part of the globe. The multiple object-sharing features enable users to share media, documents, contacts, and even their present location with other users either privately or via group messaging.

      In-app Audio/Video Calling

      The in-app audio/video calling feature is a must-have in messaging apps as it allows individuals across the globe to connect with each other from one single platform.

      Privately encrypted chats

      This functionality needs to be integrated into your messaging application as it restricts server access to metadata including chats, icons, titles, and membership icons.

      Inviting Friends

      Users should be able to invite their friends/acquaintances. So, your app should integrate “invite friends” feature that will request users to provide access to their contact details for inviting friends or acquaintances. This way, the users will be able to send the invitation link directly to the individuals they wish to add.

      Disappearing Messages & Lockable Chats

      The disappearing messages and lockable chat features provide users the flexibility to maintain the privacy of their personal life. Users can set a timer of their choice - 5 seconds, or even one week. After the end of the timeline chosen by the user, the messages will disappear automatically, without being stored in any cloud server.

      “Delete for Everyone” feature

      Signal allows one to delete messages (for everyone) unlike WhatsApp. Hence, users have the option to delete messages sent by mistake or simply if they wish to do so. So, integrating such a feature will attract users.

      Voice over Internet Protocol

      VoIP or the Voice over Internet Protocol feature is crucial as it offers a stable internet connection for ensuring an enriching communication experience, even during times of slower internet connectivity.

      Support for Proxy Version

      The proxy feature enables users to use the app seamlessly regardless of their location, even on instances when the app is blocked in some country. But, how? In Signal messaging, the proxy settings allow the user to make the necessary modifications for accessing the app since the data traffic remains opaque to the person who’s operating the proxy feature.

      Signal App Development Cost: Guidance

      Signal-like Messaging App Development: Factors that Affect the Cost

      The cost of developing a Signal-like application depends on factors like the UI design of the app, the feature-set integrated into the app, the size of the development team, and the location of the development agency hired.

      Signal-like Messaging App Development: Cost Calculation

      Check out the average estimate of developing an app like Signal. If the hourly developer rates are 50 USD, the average signal app development cost for the iOS and Android operating systems can go upwards of 70,000 USD based on the location. Here’s the breakup of the timeline and developmental expenses!

      For the Android OS: Timeline- over 900 to 1100 hours; Development Cost: Between 45,000 USD and 55,000 USD.

      For the iOS OS: Timeline- over 800 to 900 hours; Development Cost: Between 40,000 USD and 45,000 USD.

      App’s UI/UX design for a single platform: Timeline- over 80 to 100 hours; Development Cost: Between 5,000 USD and 7,000 USD.

      App’s backend: Timeline- over 600 to 800 hours; Development Cost: Between 25,000 USD and 35,000 USD.

      Now let’s take a look at the average signal app development cost based on the outsourcing region selected:

      India: Hourly rate - between 50 USD and 70 USD; Average App Development Cost- 25,000 USD

      Eastern Europe: Hourly rate - between 80 USD and 100 USD; Average App Development Cost- 40,000 USD

      Western Europe: Hourly rate - between 90 USD and 120 USD; Average App Development Cost- 65,000 USD

      Australia: Hourly rate - 100 USD; Average App Development Cost- 70,000 USD

      North America: Hourly rate - between 100 USD and 120 USD; Average App Development Cost- 70,000 USD

      Hence, outsourcing software development services to a development agency in India is the most profitable option.

      Concluding Thoughts:

      This post must have provided you with the necessary guidance on the USPs of Signal, its distinct way of functioning, and an average cost estimate of building a Signal-like messaging app. The development cost may vary as per the level of customization and complexity involved.

      For developing a best-selling messaging app, it’s advisable to hire the services of an experienced and proficient mobile app development company like Biz4Solutions. We have helped myriad clients across the globe to build outstanding and futuristic app solutions for the past 10+ years.

      To know more about our core technologies, refer to links below:

      Flutter App development

      PHP App Development

      Node.JS App Development

      Tuesday, March 22, 2022

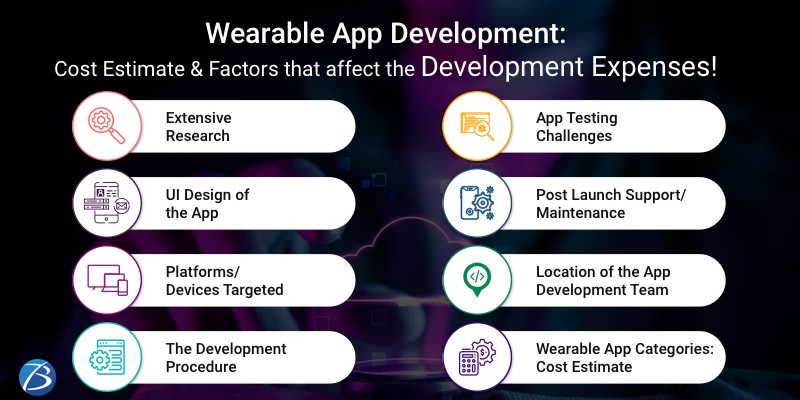
      Wearable App Development: Cost Estimate & Factors that affect the Development Expenses!

      Today, a huge chunk of tech-savvy individuals own fitness bands, smartwatches, and hands-free GPS systems. Such wearable devices are empowered with new-fangled sensors, microprocessors, and chips supported by robust operating systems. And, just like smartphones, modern wearables support various apps that can be used for syncing data from users’ devices.

      Wearable technology has worked wonders to enhance the convenience quotient of modern-day individuals. Here are some instances!

      Using Recordr, an Android wearable app, users can record sounds from their surroundings by simply tapping an icon placed on the right side of their smartwatches.

      Spotify enables users to listen to uninterrupted music, scroll through the playlists, adjust the volume, etc. without having to use a smartphone.

      Travelers can gather crucial information concerning cabs, buses, trains, ferries, etc. with the Citymapper app installed in their smartwatches.

      No wonder, the popularity and demand of wearable apps are skyrocketing! As such, entrepreneurs are keen to build wearable apps. And, many of you would like to get a rough idea about the development expenses. So, I have penned down the factors that affect the wearable app cost and provided an estimate on the developmental expenses.

      Factors affecting the Wearable App Development Cost

      Extensive Research

      Researching about the market and user base for understanding the specific requirements of target users, is an essential practice. This activity helps the software company to clearly define the project scope, eliminates unwanted glitches during wearable application development, and ensures the creation of an impeccable application. But, this research consumes a considerable amount of time and efforts. Most of the firms do charge for market research and this activity affects the price estimation of the project for sure.

      UI Design of the App

      The UI design of a wearable app is way different from that of an application developed for a tablet or mobile device. For example, a smartwatch needs to have four major interaction points – faces of the watch, voice commands, notifications, and independent wear native- based applications.

      Watch Face: If the app is time-based, a watch-like look and feel need to be created.

      Voice commands: Integrating the voice command feature within a wearable is trending these days. This feature enables users to use their voices for initiating commands. So, special attention and extra efforts are needed for crafting a voice-based user interface.

      Notifications: Notifications display contextual and movable data, and deliver a seamless user experience. This feature helps users in replying to messages, searching for a location using a map, playing their favorite songs, and many more.

      Wear Apps: These apps are likely to function without any smartphone connectivity. For building such independent applications, you may either follow a similar approach as in mobile app development or reinvent the wheel as per your specific needs.

      Platforms/Devices Targeted

      The kind of hardware devices and software platforms targeted affect wearable app costs to a great extent.

      For instance, let’s compare the expenses involved for the Android and iOS platforms. Many of us are of the opinion that wearable development for the Android platform is less complex and involves lower costs. But, in reality, developing wearables for the iOS platform is speedier and more cost-efficient. The reason is Android OS powers a wide range of wearable devices. So, Android developers have to scale the app accordingly for providing support to varying screen sizes. And, the development costs for various screen sizes differ. Therefore, Android app development is costlier and time-consuming. Coming to iOS, it powers limited devices, resulting in lower development costs as well as faster time-to-market.

      The Development Procedure

      Wearable app development is slightly different from the standard mobile app development process. Android development involves fewer interactions, has access to standard Android APIs, and also leverages the APIs as well as features of a smartwatch. iOS development, too, comes with its set of specific requirements that spikes the wearable app cost. The good news is that Apple has launched a new version namely watchOS 6 along with some APIs that will enable in delivering a robust UX; and features that support developing autonomous watch applications.

      App Testing Challenges

      The testing and maintenance costs are higher for wearable apps as compared to other mobile app categories. The reasons are as follows:

      Screen size: Wearable apps target varying screen sizes and so, need to test the app’s performance on different sized screens.

      Battery Life: The battery life of the primary device needs to be tested extensively. For this, different instances are to be considered. One instance involves switching off the primary device to check how the data gets affected.

      Data Syncing: To test the data syncing between a mobile app and its connected wearable app one needs to watch out for various scenarios like what happens when one of the devices gets switched off, how does the app perform when the Bluetooth connection gets lost, and so on. 

      A Dearth of Emulators: There are a few emulators available in the market and this expedites the Wearable app cost.

      Post Launch Support/Maintenance

      Newly launched wearable apps are likely to encounter unexpected glitches, downtime, or software failures. Needless to say, it’s advisable to hire technical support/maintenance wearable app development services for keeping up an app’s performance standards, preventing downtime, and averting incidents of wearable app failure when the load is high. These support services may be needed for multiple weeks post-app launch and incur additional expenses.

      Location of the App Development Team

      Wearable app cost is heavily dependent on the location of the app development center as the rates of hiring wearable app developers are not the same in every country/region. Take a look at the hourly rates for hiring developers from these regions:

      India – between $10 and $75 per hour

      Eastern European region – between $20 and $110 per hour

      South American region – between $25 and $120 per hour

      Australia – between $35 and $150 per hour 

      The UK – between $35 and $175 per hour

      North America – between $20 and $250 per hour  

      So, your development cost revolves around the location of your outsourcing partner. Here, North America is the most expensive option and India is the most cost-efficient choice.

      Wearable App Categories: Cost Estimate

      Here’s a rough estimate of the expenses likely to be incurred for building a wearable app based on their categories. The average cost range of building the following categories of wearable apps are as follows:

      A Fitness app like Fitbit - between $ 28,000 and $ 35,000

      An app like Starbucks - between $ 70,000 and $ 100,000

      A media-sharing app like Instagram - between $ 120,000 and $ 150,000

      An app like Airbnb - between $ 140,000 and $ 200,000

      An eCommerce app - between $ 200,000 and $ 250,000

      Final Thoughts:

      I hope, my esteemed readers are now well versed in estimating the cost of their upcoming wearable app development project and have clearly understood the major factors that drive the wearable app cost.

      For any technical assistance in tailoring wearable applications, Biz4Solutions, a distinguished software development company, will be worth a try! Our outsourcing software development services have proved beneficial to global clients for the past 10+ years.

      Monday, March 21, 2022

      All-inclusive insights on Building JavaScript microservices with Node.js!


      Is the size of your JavaScript app growing rapidly? If yes, then it must have become challenging for you to maintain the code, fix bugs, and implement new updates. So, what’s the solution? Well hiring more developers can be helpful, but at the same time might increase the project complexity and spike expenses.

      The best solution is to go for microservices architecture– distributed systems that split up large monolithic designs into smaller-sized independent programs that intercommunicate for carrying out operations and exchanging data. Using this approach an app can be structured as an amalgamation of loosely coupled services.

      Let’s explore JavaScript microservices in detail and understand why it is advisable to use Node.js architecture for building microservices. Also, get step-by-step guidance for building JavaScript microservices with Node.js.


      What is meant by microservices?

      In terms of software app development, microservices refer to a type of SOA (service-oriented architecture). Here, an assembly of interconnected services forms the app structure. Because of microservices, the architecture of the app is created using lightweight protocols such as LDAP, OpenLDAP, etc. App can be disintegrated into smaller services, and there’s room for enhanced modularity. These days, most of the cloud-based applications with a GraphQL/REST interface are developed employing microservices.


      Advantages of Microservices over Monolithic Architecture

      In Monolithic Architecture, the predecessor of microservices, all the software components, and services are put inside one large container and then packed tightly. While a monolithic app is a sole unified unit, microservices break the app structure into smaller independent units that execute each app process as a distinct service. Therefore, every service has its own logic and database and performs specific functions. So, as compared to monolithic apps, microservices apps are more flexible, scalable, reliable, and language agonistic; involve lighter iterations; optimize time to the fullest; organize data systematically. Moreover, the interfaces of microservices (API endpoints) contain a base URI. This URI identifies a data object and the standard HTTP methodologies such as POST, GET, PUT, PATCH, and DELETE that are used for manipulating the object.

      In the case of apps built on JavaScript microservices, you can focus on creating monofunctional modules having precise interfaces and clearly defined operations. This makes the app developmental process more agile, minimizing the hassles of continuous testing.

      However, since each microservice must be dealt with separately during activities like testing, deployment, caching, etc. this approach doesn’t suit all kinds of projects. Ideally, it’s advisable to use monolithic architecture when developing lightweight applications/software solutions that do not use much business logic. Microservices are recommended for building complex apps and evolving apps with scaling requirements like in SaaS solutions that may have a thousand users one day and ten thousand users the next day. 


      Node.js Microservices:

      Node.js is the most preferred choice for building JavaScript microservices. Node.js is an open-source, cross-platform RTE (runtime environment) written in a JavaScript engine and is used for developing server-side and networking apps. Node.js is executed on operating systems like Linux, Microsoft Windows, and OS X within the Node.js runtime.


      Why is Node.js preferred for creating microservices?

      The Node.js framework offers a rich database containing several JavaScript modules that eases out the development of JavaScript microservices. It is a preferred technology for building I/O bound apps, JSON API-based apps, SPAs, real-time apps that are data-intensive, data streaming apps, etc. The benefits of using Node.js for microservices development are as follows:

      Asynchronous Nature: The non-synchronous and non-blocking libraries of the Node.js environment, move on to the next API without waiting for the previous API to return data.

      Greater Cost control: Both Node.js and microservices have exceptional scaling abilities resulting in lower development and maintenance costs. Moreover, Node.js minimizes the infrastructure requirements, like memory, CPU, etc. for serving the same number of requests as compared to others, thereby lowering expenses.

      Great performance: Node.js is a popular web technology with dynamic community support and plenty of available resources. Besides, Node.js offers a standard streaming API and so ensures the secure development and sound performance of real-time apps like online gaming, chat apps, etc. Also, if one microservice is down due to issues or bugs, the entire app doesn’t get affected And, JavaScript, being an interpreted language, saves time during the compilation stage. That’s why apps that employ JavaScript microservices with Node.js perform well.

      Speed and Responsiveness:

      Node.js is single-threaded and, owing to event looping, the server employs a non-blocking mechanism for responding. Moreover, because of the notification “Events of Node.js”, the app server can capture the response of the previous API call. Buffering is minimal as data is released in chunks. Coming to speed, the V8 JavaScript engine enables Node.js developers to execute codes very fast.


      Node.js Use Cases Scenario

      Node.js is a perfect fit for the following use case scenarios:

      • You are building an enterprise application that needs to support various clients, native mobile apps, and mobile/desktop browsers; provide an API that third-parties can use, set up a continuous deployment pipeline for an app; integrate with other apps through a message broker or web services; and run several instances of the app on various machines for catering to the availability & scalability requirements of NFR.
      • You need to migrate monolithic apps for enhancing aspects/abilities like flexibility, scalability, and manageability or you have to re-platform a legacy application.
      • You have to segregate independent end-to-end services like authentication and encryption.
      • A scenario when the service provider offers the required infrastructure management and computing resources to the customer like pricing or forecasting services.
      • You have to offer back-end services for a front-end responsive web app that is likely to collect data from various data sources or channels.


      Steps for building JavaScript Microservices with Node.js


      Validate the Business Requirement

      Identify which services your business needs. For instance, you need a service where two ZIP codes and the distance between them needs to be identified. Validation techniques are required to be used to identify the ZIP code and calculating the distance. For this, this micro service needs to configure external API calls. And, if you implement an internal cache, process can become cost-effective by speedily duplicating the API calls.

      The Initialization Procedure

      At first, Install Node.js on your workstation/computer and for this, the 8.1.1 version is recommended. The Node.js Packet Manager, commonly called NPM, comes as a part of the installation suite. NPM carries out crucial functions like project launching, dependency loading, and service execution.

      Foe project initialization, open the Node.js platform, go to the root folder and then, run the command $ npm init. After the command gets executed, it makes way for the creation of the package.json file, and the creation of this file forms the foundation of project execution.

      The microservice would get created based on these two primary packages –

      • “Request” – microservices use this package for connecting with web-based or third-party APIs.
      • “Express.” – This package provides a structure for supports Node.js apps and supports the Node.js foundation of that microservice.

      These packages can be added to the package.json file by these simple steps – entering the command $ npm install express request, adding save at the end of the command, and then running this command.

      Result:

      The mpm init command creates a structure of files/folders for building a microservice and the Request and Express packages are saved within this structure in the form of dependencies. Thereafter, coding begins.

      Set up the Server

      This step is the first part of coding and here you need to create a server that recognizes and accepts requests.

      Create an entry file named server.js; it will be executed when the server starts. Make the routes available in the primary file by passing the app’s instance in the routes object. Then define the routes and when you run the server, the app listens to either port 3000 or any other port that is specified in the variable of the PORT environment.

      Specify the routes

      Then comes the next crucial step in microservice development, of specifying the routes for response transmission. The server built earlier will assign routes and these routes will make sure that all the requests are processed.

      Create a file named routes.js in your api_routes folder and add the required code to it. Now, the routes file specifies the two endpoints – the about endpoint specifies the app details, while the distance endpoint computes the distance (in miles) between both zipcodes using the external API.

      The controller file contains the implementation of these endpoints and will get us to the next step.


      Build the Controller

      Now the controller logic has to be added to the microservice to empower it with some useful functions. The controller object is used for interpreting the user intentions as well as actions to communicate the newly changed data for processing objects. It is also useful in handling requests received by the routes module that was created before. The controller file executes two functions – getDistance() and about().

      Two arguments – request & response – are accepted by the about() function. Their names, as well as version values, get stored in the properties of package.json. Likewise, the getDistance () function also contains the request & response pair of arguments; it calls the function find API that has been defined in the services folder.

      Establish the External API Call

      For creating the API call, employ a third-party API, ZipCodeAPI.com. – one can obtain a free API key by registering for an account or using the test API key.

      Now, create the microservice code through the following steps:

      • Load the request package for processing the external HTTP request
      • Load the API key and zipCodeURL available in the environment variable

      Build a request object under the find()function option, and then specify a callback function that will be called on receiving the response. This step is successfully executed if the aforesaid function is without errors and the response contains an HTTP status code 200. Thereafter, the body of the response is parsed and then returned. If the response is parsed instead of forwarding it directly, the response can be handled with optimum efficiency.  In case of any failures, they get logged to the console and the response of -1 gets returned.


      Executing the Program

      Now, execute the program by running the npm start command in your project’s terminal. If all functions run smoothly, hit the option /about web endpoint and view this output on a web browser – {“name”: “microservices”, “version”: “1.0.0”}

      Also, hit the /distance endpoint option and pass some values to it through the query string; then the desired output will be produced.

      Here, the distance of the object is exported. The controller is able to represent the concrete functions and instances of the external API calls as desired. And finally, for completing the microservices execution process, the code is reviewed for detecting any typos within the command.

      This is an example of building a microservice for finding the distance between two ZIP codes.

      Integrate a Database into your Architecture

      Now, your Node.js app is created and the data needs to be stored in a database. For this, you can use a Data API or a database. And, for seamless interaction with your databases from the Node.js app, employ a JavaScript driver.


      Concluding Words:

      I hope this post has helped you to gather handy information on building JavaScript microservices using the Node.js framework and you have clearly understood the process of building microservices.

      Require technical help in building an effective JavaScript microservice? Connect with Biz4Solutions, a highly experienced Node.js app development company. Our services have been recognized as one of the best by our global clientele.


      To know more about our other core technologies, refer to links below:

      React Native App development

      Swift App Development

      PHP App Development